[Writeups] THM - Advent of Cyber 2 (2020)
https://tryhackme.com/room/adventofcyber2
Day 1 - [Web Exploitation] A Christmas Crisis
The Web
The Internet is one of those things that everyone uses, but few people bother to learn about it. As hackers, it is vital that we understand what the web is and how it works.
When you open your web browser and navigate to a website, it seems so simple, but what is happening behind the scenes? First, your computer communicates with a known DNS (Domain Name System) server to find out where the website can be found on the internet. The DNS server will then return an IP address for the remote server. This can be used to go directly to the website. You can think of the internet as being quite like the planet itself -- we have lots of locations, all over the world. These places all have a street address -- this is akin to the domain name of a website (i.e. tryhackme.com, or google.com); but they also have coordinates that can be used to pinpoint their location with absolute accuracy. These coordinates are like the IP address of a website. If you know the street address of a location, you can enter it into Google Maps and be given the exact coordinates, which can then be put into a SatNav to take you there with pinpoint accuracy! In the same way, your browser is given the address of a website (i.e. tryhackme.com). It sends this address off to a DNS server, which tells it the "co-ordinates" (the IP address) of the site. Your computer doesn't understand the original, human-readable domain name, but it does understand what an IP address is! The IP can then be used to find the server across the internet, allowing your computer to request the content of the website. Of course, in reality, this is a highly simplified analogy, so a more in-depth explanation of this process can be found here.
HTTP(S)
Once your computer knows where it can find the target website, it sends something called an HTTP (Hypertext Transfer Protocol) request to the web server.
This is just a standard network request, but it is formatted in a way that both your web browser and the server can understand. In practice, this means adding certain "headers" to the request which identify it as an HTTP request and tell the server a variety of other information about the request, as well as your browser. Amongst many other headers, HTTP requests always have a method and a target. These specify what to retrieve from the server (the target), and how to retrieve it (the method). The method most commonly used to retrieve information is called the GET method. When sending data to the server, it's more common to use a method called POST.
For more information about HTTP requests, methods, and headers, check out the Web Fundamentals room!
Once the content has been retrieved from the server, your browser reads the retrieved code and renders it as a web page. This usually means taking the layout of the page from an HTML (Hyper Text Markup Language) document, styling it with a connected CSS (Cascading Style Sheets) file,and then adding any dynamic content with one or more connected Javascript files.
HTTP has one inherent disadvantage: namely, it is not secure. Anyone can see what you're requesting, and what's being sent back to you. For this reason, HTTPS (Hypertext Transfer Protocol Secure) was invented. This works in the same way as standard HTTP but provides an encrypted connection (the functionality of which is beyond the level of this dossier)
Cookies
HTTP is an inherently stateless protocol. This means that no data persists between connections; your computer could make two requests immediately after each other, and, without relying on separate software, the web server would have no way of knowing that it was you making both requests. This begs the important question: if HTTP is stateless, then how do login systems work? The web server must have a way to identify that you have the right level of access, and it can hardly ask you to enter your password every time you request a new page!
The answer is cookies -- tiny little pieces of information that get stored on your computer and get sent to the server along with every request that you make. Authentication (or session) cookies are used to identify you (these will be very important in your mission today!). The server receives your request with the attached cookie and checks the cookie to see what level of access you are allowed to have. It then returns a response appropriate to that level of access.
For example, a standard user should be able to see (but not interact with) our control panel; but Santa should be able to access everything! Cookies are also often used for other purposes such as advertising and storing user preferences (light/dark theme, for example); however, this will not be important in your task today. Any site can set cookies with a variety of properties -- the most important of these for today's task are the name and value of the cookies, both of which will always be set. It's worth noting that a site can only access cookies that are associated with its own domain (i.e. google.com can't access any cookies stored by tryhackme.com, and vice versa).
It's important to note that cookies are stored locally on your computer. This means that they are under your control -- i.e. you can add, edit, or delete them as you wish. There are a few ways to do this, however, it's most commonly done by using your Browser Developer Tools, which can be accessed in most browsers by pressing F12, or Ctrl + Shift + I. With the developer tools open, navigate to the Storagetab in Firefox, or the Application tab in Chrome/Edge and select the Cookies menu on the left-hand side of the console.

In the above image, you can see a test cookie for a website. The important attributes "Name" and "Value" are shown. The name of a cookie is used to identify it to the server. The value of the cookie is the data stored by the server. In this example, the server would be looking for a cookie called "Cookie Name". It would then retrieve the value "CookieValue" from this cookie.
These values can be edited by double-clicking on them, which is great if you can edit a session or authorization cookie, as this can lead to an escalation of privileges, assuming you have access to an Administrator's authorization cookie.
#1. What is the name of the cookie used for authentication?
auth
#2. In what format is the value of this cookie encoded?
hexadecimal
#3. Having decoded the cookie, what format is the data stored in?
json
#4. What is the value of Santa's cookie?
7b22636f6d70616e79223a22546865204265737420466573746976616c20436f6d70616e79222c2022757365726e616d65223a2273616e7461227d
#5. What is the flag you're given when the line is fully active?
THM{MjY0Yzg5NTJmY2Q1NzM1NjBmZWFhYmQy}
Day 2 - [Web Exploitation] The Elf Strikes Back!
GET Parameters and URLs
We looked briefly at the differences between GET and POST requests in the previous dossier; however, the emphasis was on the POST requests used in a login form. The server you'll be testing today employs a concept called "GET parameters". Just as POST requests can be used to send information to the server, so too can GET requests be used; however, there is one important difference. With POST requests the data being sent is included in the "body" of the request. With GET requests, the data is included in the URL as a "parameter". This is best demonstrated with an example:
First up we have the protocol (
https://). This specifies whether the request should be made using HTTP, or HTTPS. In our example, we are using HTTPS.Next, we have the subdomain (
www). This is traditionally "www" (World Wide Web) to signify that the target is a website; however, this is not essential. Indeed, subdomains can be anything you want; for example, a lot of websites use things like "assets", or "api" to indicate different subdomains with different uses. (e.g.https://api.thebestfestivalcompany.co.uk)The next part of the URL is the domain (
thebestfestivalcompany). Domains need to be registered and are used as links between a memorable word or phrase, and an IP address. In other words, they're used to give a name to the server running a website.Next up we have the TLD (Top Level Domain) --
.co.uk, for our example. Top-level domains are used by DNS to determine where to look if they want to find your domain. Previously top-level domains had specific uses (and many still do!), but this is not always the case these days. For example,.co.ukindicates a company based in the UK,.comindicates a company based in the US.We then have the resource that we're selecting -- in this case that is the homepage of the website:
index.php. As a side note, all homepages must be called "index" in order to be correctly served by the web server without having to be specified fully, unless this parameter has been changed from the default in the webserver configuration. This is how you can go to[https://tryhackme.com](https://tryhackme.com)without having to specify that you want to receive the home page -- the index page is served automatically because you didn't specify!The final two aspects of the URL are the most important for our current topic: they both relate to GET parameters. First up we have
?snack=. Here?is used to specify that a GET parameter is forthcoming. We then have the parameter name:snack. This is used to identify the parameter to the server. We then have an equals sign (=), indicating that the value will come next.Finally, we have the value of the GET parameter:
mincePie, because who doesn't like mince pies, right?
It's important to note exactly which part of the URL is the GET parameter. Specifically, we are talking about ?snack=mincePie. If there was more than one parameter, we would separate them with an ampersand (&). For example: ?snack=mincePie&drink=hotChocolate. In this way we can send multiple values to the server, distinguished by keys (i.e. "mincePie" is identified by the key: "snack").
File Uploads
There are countless uses for file uploads on the modern internet -- profile pictures, school/university submissions, diagrams, pictures of your dog, you name it! Whilst file uploads are very common, they're also very easy to implement in an insecure fashion. For this reason, it's important that we understand the gravity of the attack vector.
When you have the ability to upload files to a server, you have a path straight to RCE (Remote Command Execution). An upload form with no restrictions would mean that you could upload a script that, when executed, connects back to your attacking machine and gives you the ability to run any command you want. It would be very unusual to find a file upload with no filtering, but it's much less uncommon to find a file upload that employs flawed filtering techniques that can be circumvented to upload a malicious script. The script has to be written in a language that the server can execute. PHP is usually a good choice for this, as most websites are still written with a PHP back end.
File Extension Filtering: As the name suggests extension filtering checks the file extension of uploaded files. This is often done by specifying a list of allowed extensions and then checking the uploaded file against the list. If the extension is not in the allowlist, the upload is rejected.
So, what's the bypass? Well, the answer is that it depends entirely on how the filter is implemented. Many extension filters split a filename at the dot (
.) and check what comes after it against the list. This makes it very easy to bypass by uploading a double-barrelled extension (e.g..jpg.php). The filter splits at the dot(s) and then checks what it thinks is the extension against the list. If jpg is an allowed extension then the upload will succeed and our malicious PHP script will be uploaded to the server.
When implementing an upload system, it's good practice to upload the files to a directory that can't be accessed remotely. Unfortunately, this is often not the case, and scripts are uploaded to a subdirectory on the web server (often something like /uploads, /images, /media, or /resources). For example, we might be able to find the uploaded script at https://www.thebestfestivalcompany.co.uk/images/shell.jpg.php.
Reverse Shells
Let's assume that we've found somewhere to upload our malicious script, and we've bypassed the filter -- what then? There are a few paths we can take: the most common of which is uploading a reverse shell. This is a script that creates a network connection from the server, to our attacking machine. The majority of web servers are written with a PHP back end, which means we need a PHP reverse shell script -- there happens to be one already on Kali/AttackBox at /usr/share/webshells/php/php-reverse-shell.php (Note: if you're not using Kali or the provided AttackBox, the same script can be found here.
Copy the web shell out into your current directory (
cp /usr/share/webshells/php/php-reverse-shell.php .), then open it with your text editor of choice.Scroll down to where it has
$ipand$port(both marked with// CHANGE THIS). Set the IP to your TryHackMe IP Address (which can be found in the green bubble on the navbar, if you're using the AttackBox, or by runningip a show tun0if you're using your own Linux VM with the OpenVPN connection pack) -- making sure to keep the double-quotes. Set the port to443with no double quotes, then save and exit the file. Congratulations, you now have a fully configured PHP reverse shell script!
Reverse Shell Listeners
We've spoken at length about reverse shell listeners, but what are they? In short, a reverse shell listener is used to open a network socket to receive a raw connection -- like the one created by a reverse shell being executed! The simplest form of a listener is created by using a program called Netcat, which is installed on both Kali and the AttackBox by default. We can create a listener for an uploaded reverse shell by using this command: sudo nc -lvnp 443. This essentially creates a listener on port 443. In a real-world environment, you would want to use a common port such as 443 that is not filtered by firewalls in most scenarios, increasing the chances our reverse shell connects back.. Once Netcat has been set up, our reverse shell will be able to connect back to this when activated.
The full explanation can be found in the Intro to Suser'shells room linked above if you're interested.
#1 What string of text needs adding to the URL to get access to the upload page?
?id=ODIzODI5MTNiYmYw
#2 What type of file is accepted by the site?
image
#3 In which directory are the uploaded files stored?
/uploads/
#4 Activate your reverse shell and catch it in a netcat listener!
nc -lvnp 1234
#5 What is the flag in /var/www/flag.txt?
THM{MGU3Y2UyMGUwNjExYTY4NTAxOWJhMzhh}
Day 3 - [Web Exploitation] Christmas Chaos
Authentication
Authentication is a process of verifying a users' identity, normally by credentials (such as a username, user id or password); to put simply, authentication involves checking that somebody really is who they claim to be. Authorization (which is fundamentally different to authentication, but often used interchangeably) determines what a user can and can't access; authorization is covered in tomorrow walkthrough, today's task focuses on authentication and some common flaws.
Default Credentials
You've probably purchased (or downloaded a service/program) that provides you with a set of credentials at the start and requires you to change the password after it's set up (usually these credentials that are provided at the start are the same for every device/every copy of the software). The trouble with this is that if it's not changed, an attacker can look up (or even guess) the credentials.
What's even worse is that these devices are often exposed to the internet, potentially allowing anyone to access and control it. In 2018 it was reported that a botnet (a number of internet-connected devices controlled by an attacker to typically perform DDoS attacks) called Mirai took advantage of the Internet of Things (IoT) devices by remotely logging, configuring the device to perform malicious attacks at the control of the attackers; the Mirai botnet infected over 600,000 IoT devices mostly by scanning the internet and using default credentials to gain access.
In fact, companies such as Starbucks and the US Department of Defense have been victim to leaving services running with default credentials, and bug hunters have been rewarded for reporting these very simple issues responsibly (Starbucks paid $250 for the reported issue):
https://hackerone.com/reports/195163 - Starbucks, bug bounty for default credentials.
https://hackerone.com/reports/804548 - US Dept Of Defense, admin access via default credentials.
In 2017, it was reported that 15% of all IoT devices still use default passwords.
SecLists is a collection of common lists including usernames, passwords, URLs and much more. A password list known as "rockyou.txt" is commonly used in security challenges, and should definitely be a part of your security toolkit.
Dictionary Attacks using BurpSuite
A dictionary attack is a method of breaking into an authenticated system by iterating through a list of credentials. If you have a list of default (or the most common) usernames and passwords, you can loop through each of them in hopes that one of the combinations is successful.
You can use a number of tools to perform a dictionary attack, one notable one being Hydra (a fast network logon cracker) and BurpSuite, an industry-standard tool used for web application penetration testing. Given day 3 is about web exploitation, we'll show you how to use BurpSuite to perform a dictionary attack on a web login form.
To download BurpSuite click here, otherwise, BurpSuite is pre-installed on our web-based AttackBox.
Start BurpSuite, you can do this on the AttackBox by clicking the BurpSuite logo.
Once this has loaded, you want to "Intercept" your traffic by proxying it through the BurpSuite, which will then forward the request to the intended destination (in our case it will be a website) This will give you the ability to analyse and modify your browsers traffic.
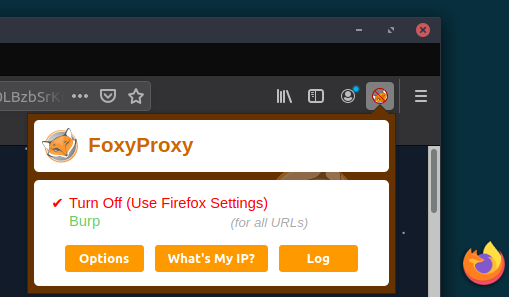
This example uses the AttackBox, and makes proxying traffic to BurpSuite easy (if you're using BurpSuite on your own machine, click here) to see how to proxy traffic to BurpSuite). On the AttackBox, open Firefox, click on the FoxyProxy browser extension, and select "Burp" - this will now proxy your traffic to BurpSuite.
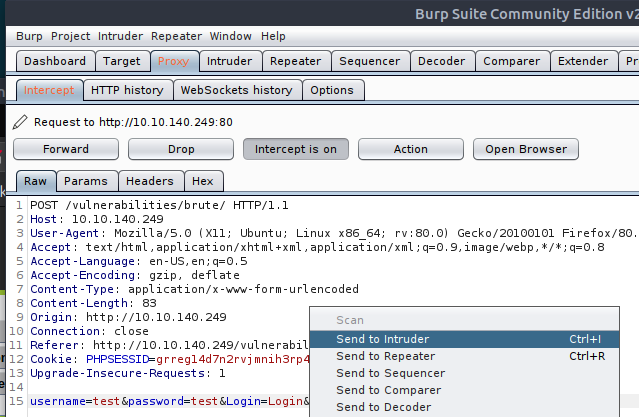
Go to the BurpSuite application and click the Proxy tab, then click the button "Intercept is on".
Navigate to your chosen website, as you're intercepting your traffic, you will see BurpSuite has held your request and will not forward it on until you tell it to. Let's go to our web application and submit your details into a given form, in our case its a generic login form.
This captured request will show up in the Proxy tab. Right-click it, and click "Send to Intruder"; BurpSuite has a lot of functionality to repeat modify and manipulate requests, Burp Intruder is a tool to automate customize web attacks. We will use intruder to loop through and submit a login request using a list of default credential, in the hopes that one of the usernames and passwords in the list is correct.
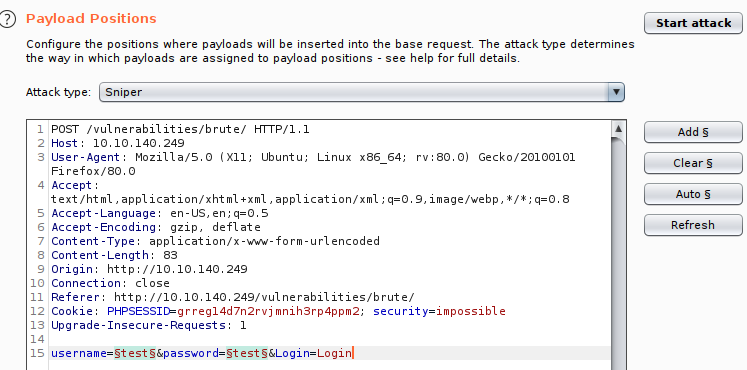
Go to the Intruder tab, you should see your request. Here we will insert "positions" (telling Burp which fields to update when automating a request), select a list per position and start the attack.
Click the "Positions" tab, and clear the pre-selected positions.
Add the username and password values as positions (highlight the text and click "Add")
Select "Cluster Bomb" in the Attack type dropdown menu; this attack type iterates through each payloads sets in turn, so every combination of each set is tested.
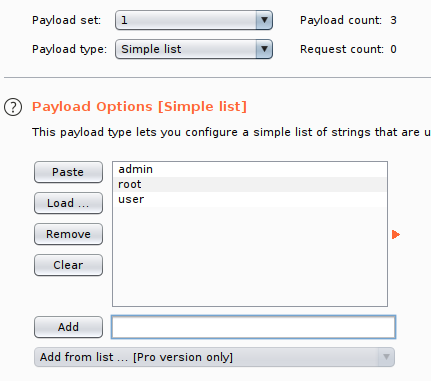
We're going to tell each "Position" which Payload to use. In our example, we will select a list of usernames for the username field and a list of passwords for the password field.
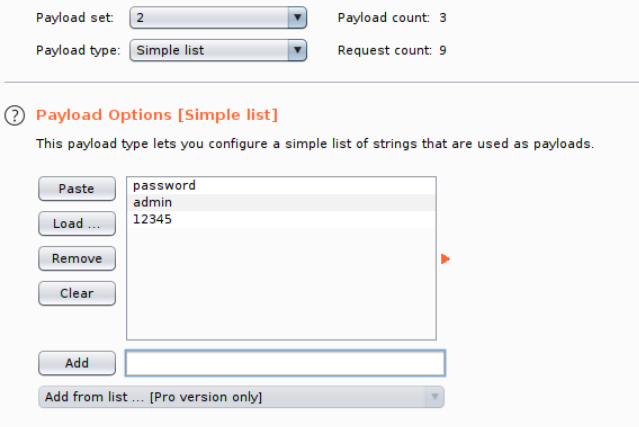
Click the "Payloads" tab, select your Payload set (set 1 is the username field, set 2 is the password field) and add select your list in the "Payload Options" section (or manually add entries).
For set 1 (username), we will add a few common default username entries such as "admin", "root" and "user"
For set 2 (password), we will add a few common default passwords such as "password", "admin" and "12345"
Click the "Start Attack" button, this will loop through each position list in every combination. You can sort by the "Length" or "Status" to identify a successful login (typically all incorrect logins will have the same status or length, if a combination is correct it will be different.
#1What is the flag?
THM{885ffab980e049847516f9d8fe99ad1a}
Day 4 - [Web Exploitation] Santa's watching
What is Fuzzing? To keep it simple, fuzzing can be argued as "fancy brute-forcing" to some degree. However, you can fuzz what you can't brute-force. Fuzzing is using security tools to automate the input of data we provide into things such as websites or software applications. Fuzzing is an extremely effective process as computers can perform laborious actions like trying to find hidden files/folders, try different username and passwords much quicker then a human can (and is willing to do...)
Poorly built applications are often unable to handle data the way it is supposed to under intense load. Moreover, the data we're parsing to the application may be interpreted and executed (instead of being handled correctly i.e. system commands). We can use fuzzing to cause the application to trigger what's known as an error condition where this may be abused by a penetration tester or a bug bounty hunter.
An Introduction to Using Gobuster
Logically speaking, there are many pieces to a website that the average user doesn't see. They can be anything from a sitemap to a secret directory which contains important files. Unfortunately, this can cause developers to get a bit lazy, and not protect these directories, allowing anyone who finds out that they exist to steal the important data. gobuster is the tool that helps us discover these valuable directories if they exist. The idea behind the tool itself is simple, brute-forcing common paths to check if it's valid. Similar to how you would in your browser, albeit this tool is much, much quicker. Gobuster has three modes: dir, vhost and dns.
For the sake of today, we're going to be using gobuster in dir mode, as this is the most likely mode that you'll be using day-to-day. dir (short for directory) can be selected by using gobuster dir <rest of command>
#1 Given the URL "http://shibes.xyz/api.php", what would the entire wfuzz command look like to query the "breed" parameter using the wordlist "big.txt" (assume that "big.txt" is in your current directory)
wfuzz -c -z file,big.txt http://shibes.xyz/api.php?breed=fuzz
#2 Use GoBuster (against the target you deployed -- not the shibes.xyz domain) to find the API directory. What file is there?
site-log.php


#3 Fuzz the date parameter on the file you found in the API directory. What is the flag displayed in the correct post?

THM{D4t3_AP1}
Day 5 - [Web Exploitation] Someone stole Santa's gift list!
What is SQL Injection?
A SQL injection (SQLi) attack consists of the injection of a SQL query to the remote web application. A successful SQL injection exploit can read sensitive data from the database (usernames & passwords), modify database data (Add/Delete), execute administration operations on the database (such as shutdown the database), and in some cases execute commands on the operating system.
How does an SQLi attack work?
SQLi is carried out through abusing a PHP GET parameter (for example ?username=, or ?id=) in the URL of a vulnerable web page. These are usually located in the search fields and login pages, so as a penetration tester, you need to note those down.
Here's an example of a username input field written in PHP:
After a variable username was inputted in the code, PHP automatically uses SQL to select all users with the provided username. Exactly this fact can be abused by an attacker.
Let's say a malicious user provides a quotation mark (') as the username input. Then the SQL code will look like this:
As you can see, that mark creates a third one and generates an error since the username should only be provided with two. Exactly this error is used to exploit the SQL injection.
Generally speaking, SQL injection is an attack in which your goal is to break SQL code execution logic, inject your own, and then 'fix' the broken part by adding comments at the end.
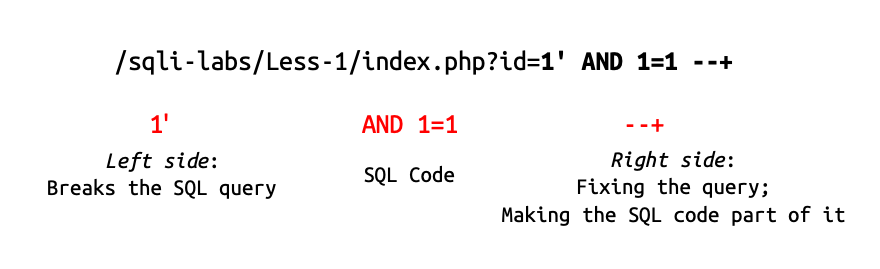
Graphical interpretation
Most commonly used comments for SQLi payloads:
Login Bypass with SQL Injection
One of the most powerful applications of SQL injection is definitely login bypassing. It allows an attacker to get into ANY account as long as they know either username or password to it (most commonly you'll only know username).
First, let's find out the reason behind the possibility to do so. Say, our login application uses PHP to check if username and password match the database with following SQL query:
As you see here, the query is using inputted username and password to validate it with the database.
What happens if we input ' or true -- username field there? This will turn the above query into this:
The -- in this case has commented out the password checking part, making the application forget to check if the password was correct. This trick allows you to log in to any account by just putting a username and payload right after it.
Note that some websites can use a different SQL query, such as:
In this case, you'll have to add a single bracket to your payload like so: ') or true– to make it work.
You can practice login bypassing on a deployed machine, port 3000 (First browse to 10.10.172.32:3000/init.php and then to 10.10.172.32:3000). I've put an extra interactive exercise there. It'll show you all back end output, allowing you to experiment and practice with SQL commands.
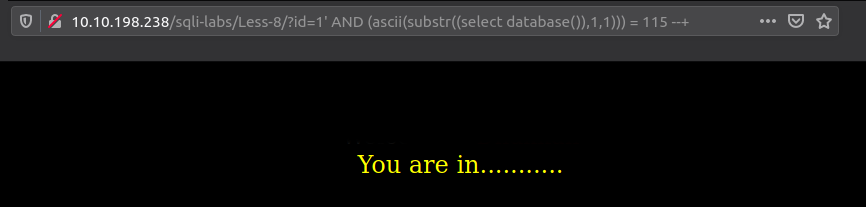
Blind SQL Injection
In some cases, developers become smart enough to mitigate SQL Injection by restricting an application from displaying any error. Happily, this does not mean we cannot perform the attack. Blind SQL Injection relies on changes in a web application, during the attack. In other words, an error in SQL query will be noticeable in some other form (i.e changed content or other).
Since in this situation we can only see if an error was produced or not, blind SQLi is carried out through asking 'Yes' or 'No' questions to the database (Error = 'No', No Error = 'Yes'). Through that system, an attacker can guess the database name, read columns and etc. Blind SQLi will take more time than other types but can be the most common one in the wild.
Start off with finding a way to cause the SQL error and then fixing it back.
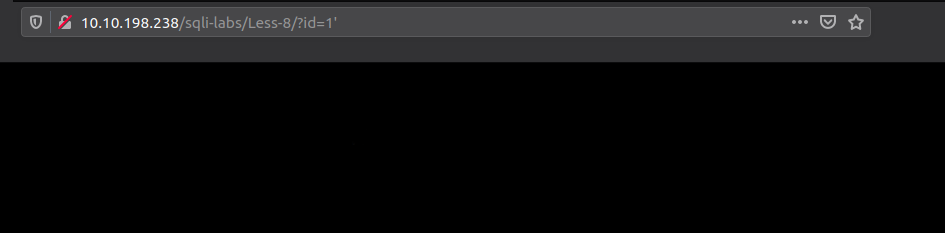
Breaking the application
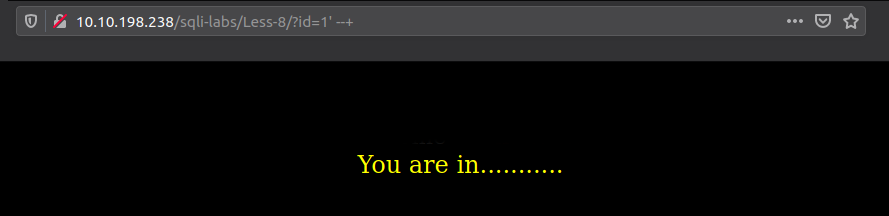
Fixing it - Notice how the app did not output any error, even though I've clearly caused an SQL error.
For asking the questions, you can use SUBSTR() SQL function. It extracts a substring from a string and allows us to compare the substring to a custom ASCII character.
The above code is asking the database if its name's first letter is equal to 155 ('s' in ASCII table).
Now put this into a payload:
The payload is the question. If the application does not produce any changes, then the answer is 'Yes' (the database's first letter is 's'). Any error or change = 'No'.
Note: You can use blind SQLi injection techniques in the 'open' situation too.
UNION SQL Injection
UNION SQLi is mainly used for fast database enumeration, as the UNION operator allows you to combine results of multiple SELECT statements at a time.
UNION SQLi attack consists of 3 stages:
Finding the number of columns
Checking if the columns are suitable
Attack and get some interesting data.
Determining the number of columns required in an SQL injection UNION attack
There are exactly two ways to detect one:
The first one involves injecting a series of ORDER BY queries until an error occurs. For example:
(The last value before the error would indicate the number of columns.)
The second one (most common and effective), would involve submitting a series of UNION SELECT payloads with a number of NULL values:
No error = number of NULL matches the number of columns.
Finding columns with a useful data type in an SQL injection UNION attack
Generally, the interesting data that you want to retrieve will be in string form. Having already determined the number of required columns, (for example 4) you can probe each column to test whether it can hold string data by replacing one of the UNION SELECT payloads with a string value. In case of 4 you would submit:
No error = data type is useful for us (string).
Using an SQL injection UNION attack to retrieve interesting data
When you have determined the number of columns and found which columns can hold string data, you can finally start retrieving interesting data.
Suppose that:
The first two steps showed exactly two existing columns with useful datatype.
The database contains a table called users with the columns username and password.
In this situation, you can retrieve the contents of the user's table by submitting the input:
Here's a small list of thing you'd want to retrieve:
database()
user()
@@version
username
password
table_name
column_name
SQLMap
SQLMap is an open-source penetration testing tool that automates the process of detecting and exploiting SQL injection flaws and taking over of database servers. It's an incredible tool that can be learned within minutes. It's already included in THM's AttackBox or you can install it locally by running:
Here are some of the most common options that you would configure when using SQLMap:
Command
--url
Provide URL for the attack
--dbms
Tell SQLMap the type of database that is running
--dump
Dump the data within the database that the application uses
--dump-all
Dump the ENTIRE database
--batch
SQLMap will run automatically and won't ask for user input
Let's show an example of an SQLMap command. Let's say we have a vulnerable login form located at "http://tbfc.net/login.php". (Note, this is just an example, please do not SQLMap this website as no consent has been given by the owner.) We would use this alongside --url to tell SQLMap where to attack. i.e. sqlmap --url http://tbfc.net/login.php
Where we can then proceed to enumerate what data is in the application's database with options such as --tables and --columns. Leaving our final SQLMap looking like so: sqlmap --url http://tbfc.net/login.php --tables --columns
Again, tbfc.net is given as an example, please do not perform any attack on this site.
You can find a cheatsheet for more snippets of SQLMap commands here
SQLMap & BurpSuite
The most beneficial feature of sqlmap is its integration with BurpSuite.
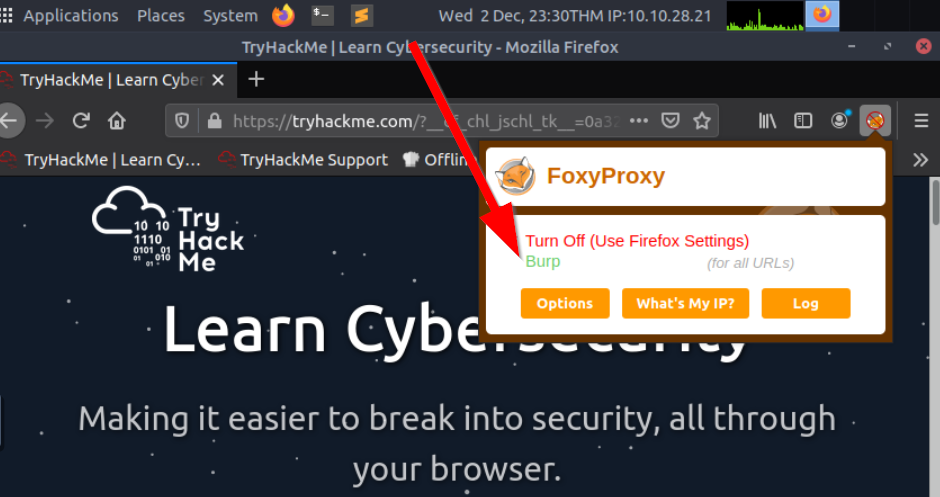
With BurpSuite, you can capture and save login or search information to use with SQLMap. This is done by intercepting a request. You will need to configure your browser to use BurpSuite as a proxy for this request to capture. The AttackBox has made this simple for you by using the FoxyProxy extension in Firefox.
First let's startup BurpSuite located in "Applications -> Web -> BurpSuite Community Edition" on the AttackBox
Use Firefox to visit the application we suspect to be vulnerable
Enable FoxyProxy in Firefox:
Submit a request on the web application we suspect to be vulnerable
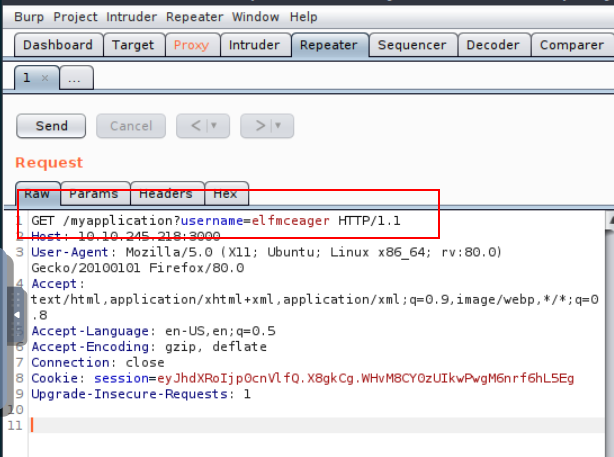
Send the request from the "Proxy" tab to the repeater by right-clicking and pressing "Send to Repeater"
Notice our request is now in the "Repeater" tab:
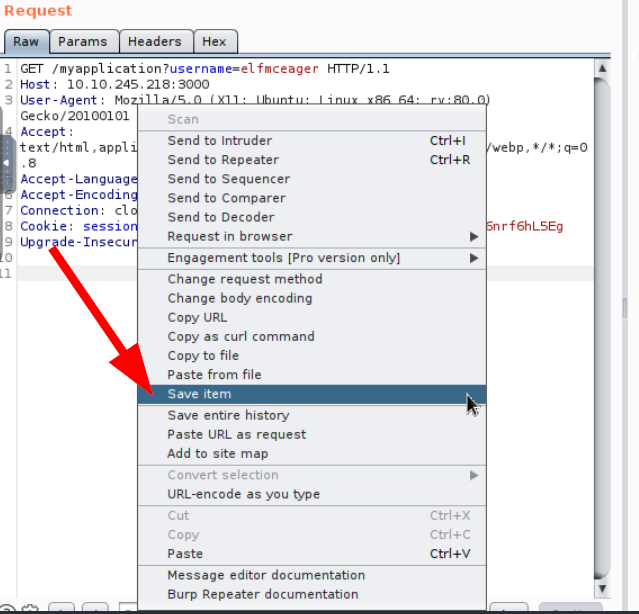
Finally, save this request by right-clicking and pressing "Save item"
We can then use this request in SQLMap:
SQLMap will automatically translate the request and exploit the database for you.
#1 Without using directory brute forcing, what's Santa's secret login panel?
/santapanel
#2 How many entries are there in the gift database?


22
#3 What did Paul ask for?
github ownership
#4 What is the flag?
thmfox{All_I_Want_for_Christmas_Is_You}
#5 What is admin's password?
EhCNSWzzFP6sc7gB
Day 6 - [Web Exploitation] - Be careful with what you wish on a Christmas night
What is XSS?
Cross-site scripting (XSS) is a web vulnerability that allows an attacker to compromise the interactions that users have with a vulnerable application. Cross-site scripting vulnerabilities normally allow an attacker to masquerade as a victim user, and carry out any actions that the user is able to perform. If the victim user has privileged access within the application (i.e admin), then the attacker might be able to gain full control over all of the application's functionality and data. Even if a user is a low privileged one, XSS can still allow an attacker to obtain a lot of sensitive information.
Why does it work like that?
XSS is exploited as some malicious content is being sent to the web browser, often taking the form of JavaScript payload, but may also include HTML, Flash, or any other type of code that the browser may execute. The variety of attacks based on XSS is almost limitless, but all of them come down to exactly two types: stored and reflected.
Types of XSS
Stored XSS works when a certain malicious JavaScript is submitted and later on stored directly on the website. For example, comments on a blog post, user nicknames in a chat room, or contact details on a customer order. In other words, in any content that persistently exists on the website and can be viewed by victims.
Let's say we have a website with comments (Code above). A normal comment is put under <p></p> tags and displayed on the website. A malicious user can put <script></script> tags in that field to execute the evilcode() function every time a user sees this comment.
Stored XSS gives an attacker an advantage of 'injecting' malicious JavaScript behind images. By using <img> attributes it is possible to execute custom JS code when the image is viewed or clicked. For example:
In this case, an attacker embeds an image that is going to execute alert('xss') if the user's mouse goes over it.
Say we have a web application that allows users to post their comments under the post.
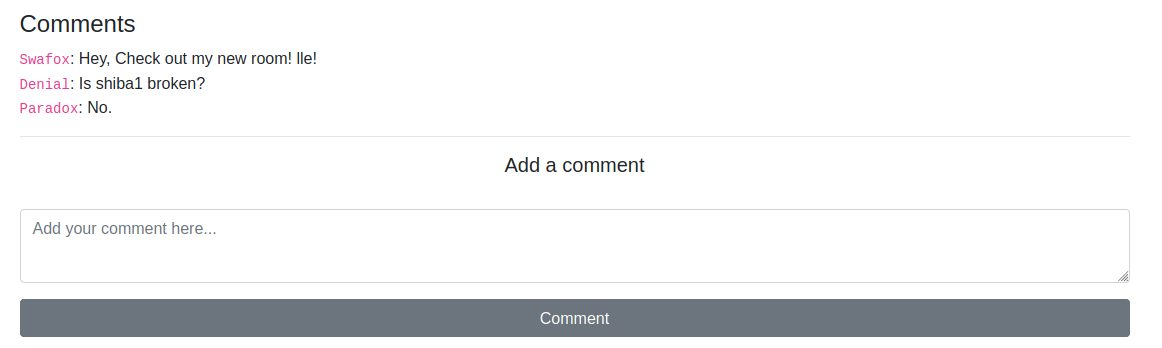
An attacker can exploit this by putting an XSS payload instead of their comments and force everyone to execute a custom javascript code.
This is what happens if we use the above <img> payload there:
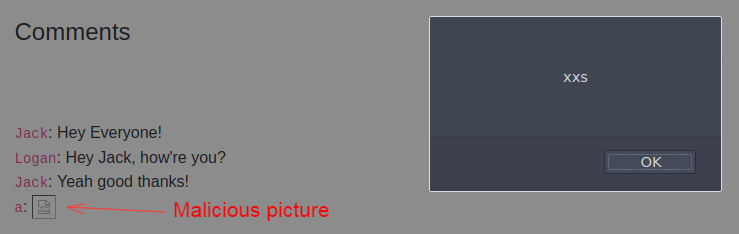
A malicious picture executes a custom alert('xss') once being viewed. This is the most common example of stored XSS.
Reflected is another type of XSS that is carried out directly in the HTTP request and requires the attacker to do a bit more work. An example of this could be malicious javascript in the link or a search field. The code is not stored on the server directly, meaning that a target user should compromise himself by clicking the link.
Here's a quick example of an URL with malicious javascript included:
Any user that clicks on the link is going to execute the evilcode() function, eventually falling under the XSS attack.
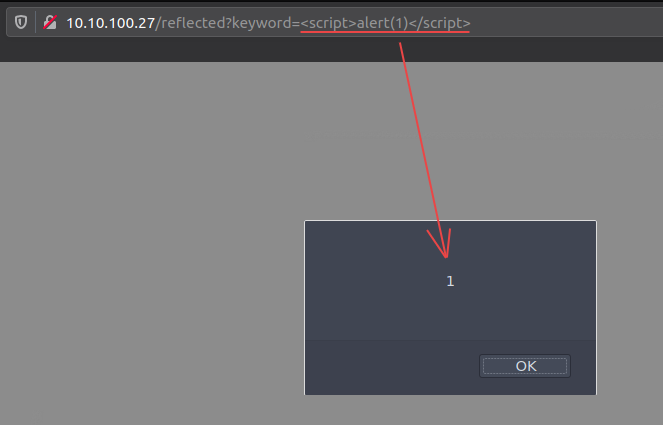
Let's say a website is using a query string keyword in its URL 10.10.100.27/reflected?keyword=hello like so:

A search query is put after this keyword parameter. The XSS can be exploited by putting a payload instead of the search query.
The url starts with 10.10.100.27/reflected?keyword=. By adding text onto the keyword, we can perform reflected XSS like 10.10.100.27/reflected?keyword=<script>alert(1)</script> which results in an alert box with 1 on our screen.
Bingo! The XSS was successfully exploited!
How to detect XSS?
Both reflected and stored XSS vulnerabilities can be detected in a similar way: through the use of HTML tags, such as <h1></h1>, <b></b> or others. The idea is to try out inputting text with those tags and see if that produces any differences. Any change in text size or color immediately indicates an XSS vulnerability.
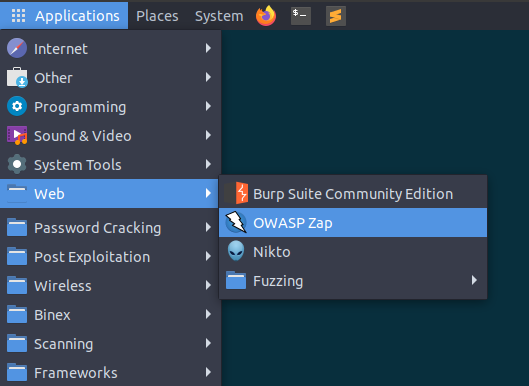
But sometimes, it might be challenging to find them manually, and of course, we cannot forget about the basic human error. Happily, there's a solution for that! OWASP ZAP is an open-source web application security scanner. It can automatically detect web vulnerabilities. You can launch ZAP by going to 'Applications -> Web -> Owasp Zap' on the attack box:
You'll see a fairly simple interface upon the launch.
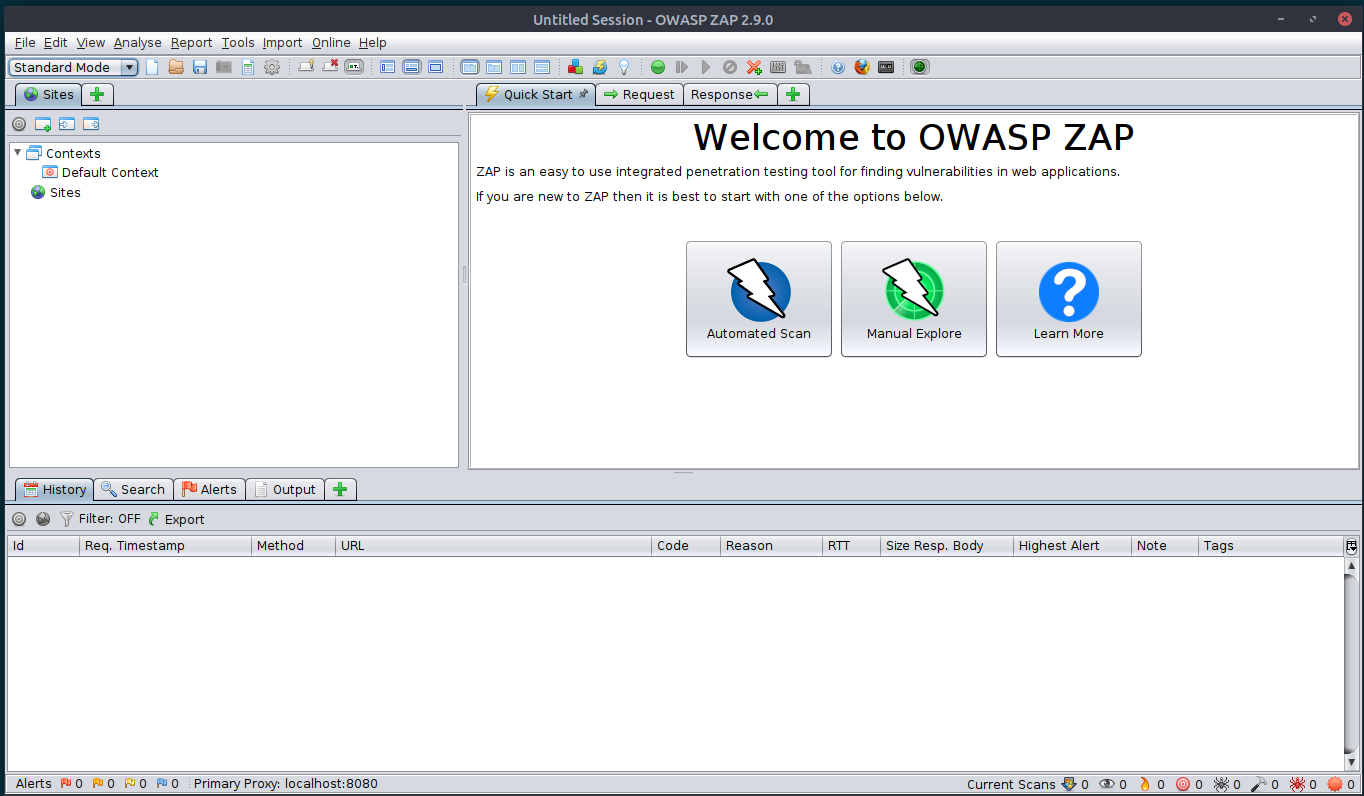
On the right, you can see a button titled 'Automated scan'. Click it and it'll take you to the attack configuration page.
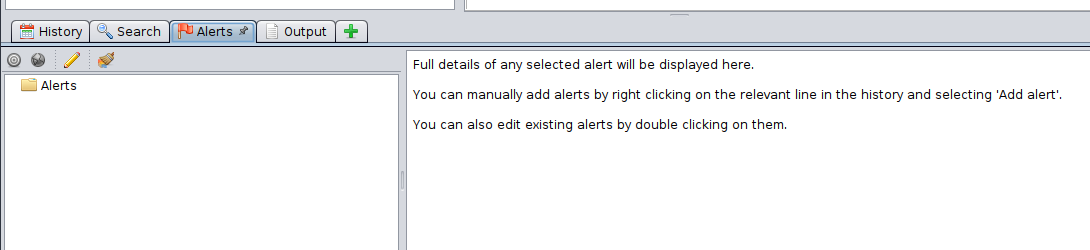
Now, simply put the target URL in the 'URL to attack' field and press 'Attack'! After some time, all the vulnerabilities will be displayed in the 'Alerts' tab:
Bonus: Mitigating XSS
The rule is simple: all user input should be sanitized at both the client and server-side so that potentially malicious characters are removed. There are libraries to help with this on every platform. Smart developers should always implement a filter to any text input field and follow a strict set of rules regarding processing the inputted data. For more info about this, check out OWASP's guide:
#1 What vulnerability type was used to exploit the application?
stored cross-site scripting
#2 What query string can be abused to craft a reflected XSS?

q
#3 Run a ZAP (zaproxy) automated scan on the target. How many XSS alerts are in the scan?
This question was error or something. I had scanned the url and found 6 alerts as you can see in the image below but the answer was 2. I think something wrong here but I was too lazy to report to THM

2
Day 7 - [Networking] The Grinch Really Did Steal Christmas
#1 Open "pcap1.pcap" in Wireshark. What is the IP address that initiates an ICMP/ping?
10.11.3.2
#2 If we only wanted to see HTTP GET requests in our "pcap1.pcap" file, what filter would we use?
http.request.method == GET
#3 Now apply this filter to "pcap1.pcap" in Wireshark, what is the name of the article that the IP address "10.10.67.199" visited?
This challenge was given a hint "/posts/", thus I've tried to check every single path with /posts/ and then I got the article name
reindeer-of-the-week
Let's begin analysing "pcap2.pcap". Look at the captured FTP traffic; what password was leaked during the login process?
#4 There's a lot of irrelevant data here - Using a filter here would be useful!

plaintext_password_fiasco
#5 Continuing with our analysis of "pcap2.pcap", what is the name of the protocol that is encrypted?

SSH
Analyse "pcap3.pcap" and recover Christmas!
#6 What is on Elf McSkidy's wishlist that will be used to replace Elf McEager?
Export HTTP object then I got this

Save christmas.zip and extract it, I got some pics and files

Then, I've tried to open every single file and in the elf_mcskidy_wishlist.txt and I got the name

Rubber ducky
Day 8 - [Networking] What's Under the Christmas Tree?
TCP Scanning
There are two common TCP scan types that you'll be using in Nmap. On the surface they seem to perform the same thing, however, they're very different. Before we break this down, let's illustrate TCP/IP's three-way-handshake again and recap the three stages of a "normal" three-way-handshake:
SYN
SYN/ACK
ACK

Connect Scan -
nmap -sT <ip>SYN Scan -
nmap -sS <ip>
SYN Scan:
The most favourable type of scan, Nmap uses the TCP SYN scan (-sS) if the scan is run with both administrative privileges and a different type isn't provided. Unlike a connect scan, this scan type doesn't fulfil the "three-way-handshake" as what would normally take place. Instead, after the "SYN/ACK" is received from the remote host, a "RST" packet is sent by the host that we are scanning from (never completing the connection).
This scan type is the most favourable method as Nmap can use all the information gathered throughout the handshake to determine port status based on the response that is given by the IP address that is being scanned:
SYN/ACK = open
RST = Closed
Multiple attempts = filtered
Not only this but also since fewer packets are sent across a network, there is less likelihood of being detected.
Nmap Timing Templates
Nmap allows the user to determine Nmap's performance. Measured in aggressiveness, a user can use one of six profiles [0 to 5] to change the rate at which Nmap scans at. With -T0 being the stealthiest, this profile scans one port every 5 minutes, whereas -T5 is considered both the most aggressive and potential to be inaccurate. This is because the -T5 waits a mere 0.3 seconds for the remote device to respond to a handshake. Factors such as those listed below determine how accurate these scans are:
The resource usage a remote server is under. The higher usage, the slower it is to send a response to Nmap.
The quality of the connection. If you have a slow or unstable connection, you are likely to miss responses if you are sending many packets at once.
Generally speaking, you will want to use low-aggressive profiles for real-world scenarios, however, in a lab environment where noise doesn't matter - high-aggressive profiles prove to be the quickest. For perspective, Nmap uses -T3 if no profile is provided. In a pentesting situation, you'd be inclined to use a lower value such as within in a lab environment, a higher value-T4 will suffice as stealth is not as critical.
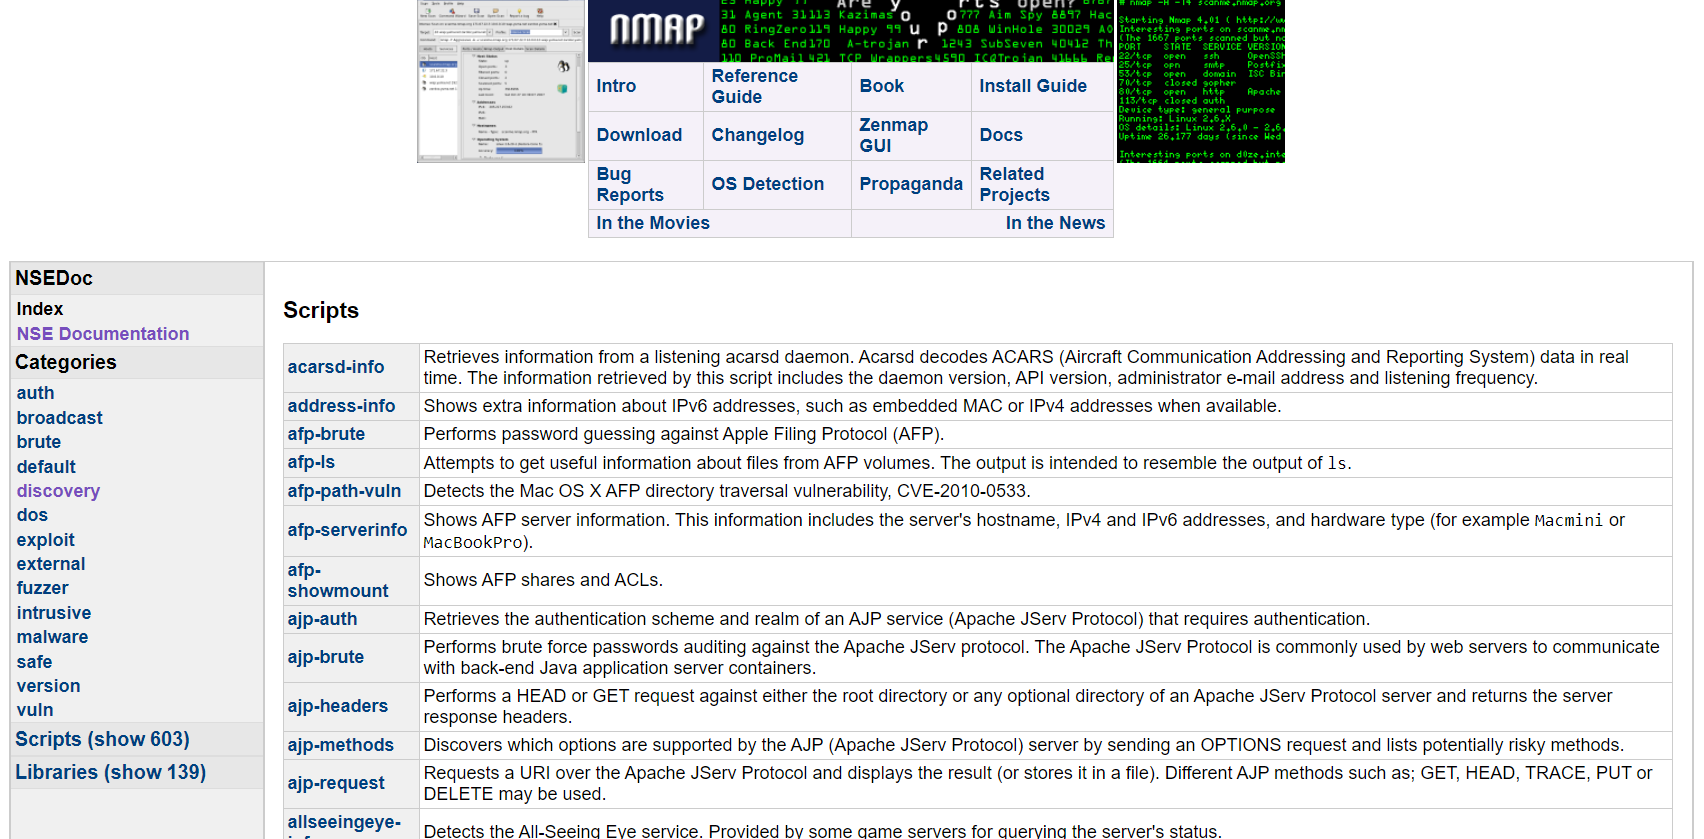
An Introduction to Nmap's Scripting Engine
A recent addition to Nmap is the Nmap Scripting Engine or NSE for short. This feature introduces a "plug-in" nature to Nmap, where scripts can be used to automate various actions such as:
Exploitation
Fuzzing
Bruteforcing
At the time of writing, the NSE comes with 603 scripts, which can be found here.
Nmaps NSE Documentation Page
Take for example the FTP ProFTPD Backdoor script. This script attempts to exploit an FTP service that is running ProFTPD version 1.3.3c, the version of which is fingerprinted by Nmap itself.
We can provide the script that we want to use by using the --script flag in Nmap like so:nmap --script ftp-proftpd-backdoor -p 21 <ip_address>
Additional Scan Types:
Not only can we use the Nmap's TCP Scan, but Nmap also boasts a combination of these types for various actions that are useful to us during the information gathering stage. I have assorted these into the table below, giving a brief explanation of their purpose.
(Where x.x.x.x == MACHINE_IP )
Flag
Usage Example
Description
-A
nmap -A x.x.x.x
Scan the host to identify services running by matching against Nmap's database with OS detection
-O
nmap -O x.x.x.x
Scan the host to retrieve and perform OS detection
-p
nmap -p 22 x.x.x.x
Scan a specific port number on the host. A range of ports can also be provided (i.e. 10-100) by using the first and last value of the range like so: nmap -p 10-100 x.x.x.x
-p-
nmap -p- x.x.x.x
Scan all ports (0-65535) on the host
-sV
nmap -sV x.x.x.x
Scan the host using TCP and perform version fingerprinting
Defending against Nmap Scans
The practice of security through obscurity doesn't work here. Whilst it may seem logical to attempt to hide a service by changing its port number to something other than the standard (such as changing SSH from port 22 to 2222), the service will still be fingerprinted during an Nmap scan (albeit slightly later on). Unfortunately, you cannot get the best of both worlds in having a service available yet hidden.
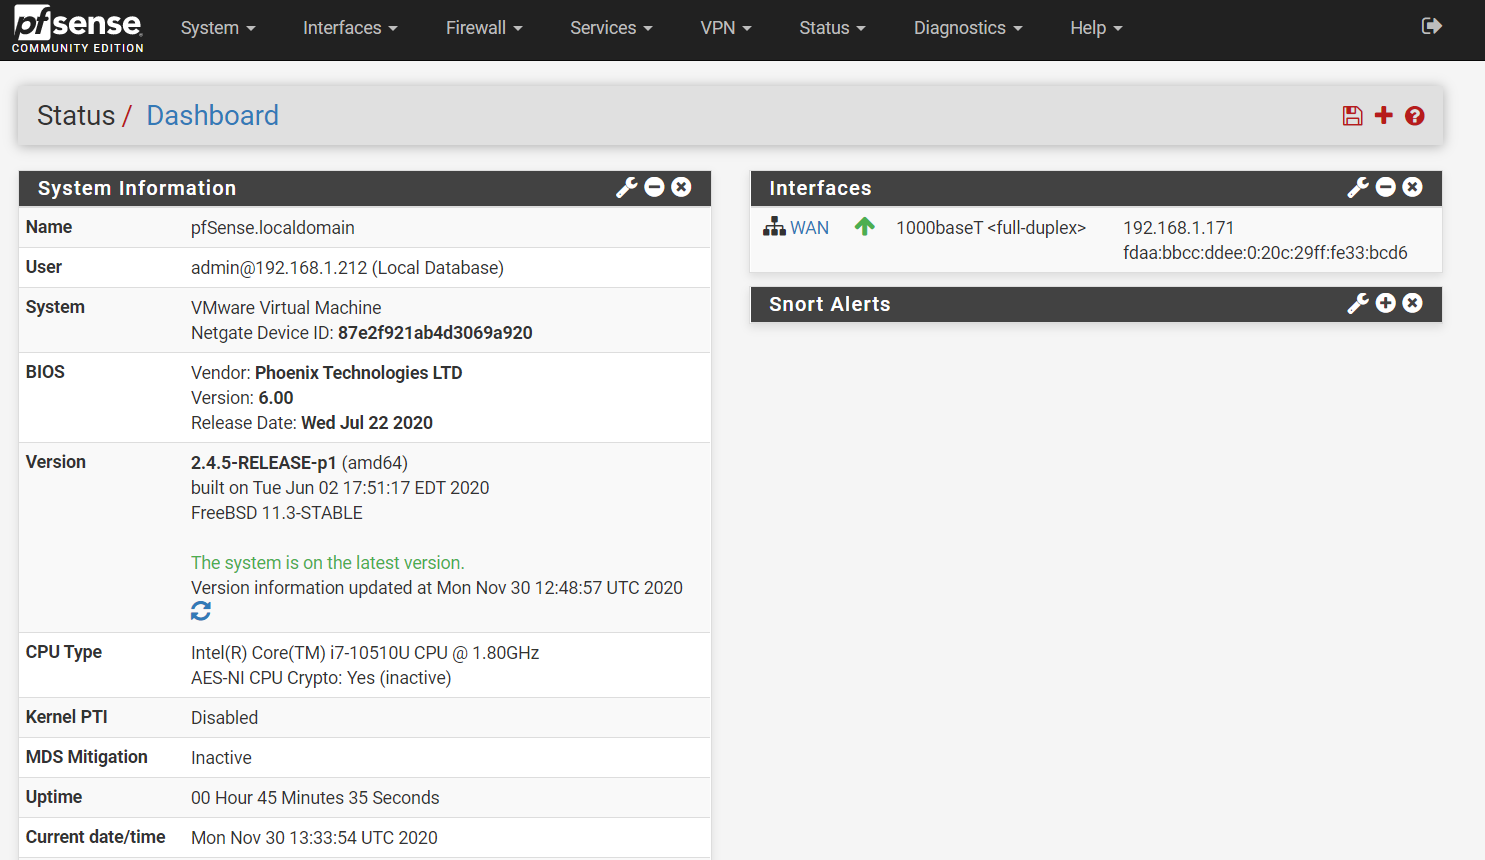
Fortunately, open-source Intrusion Detection (IDS) & Prevention Systems (IPS) such as Snort and Suricata allows blue-teamers to protect their networks using network monitoring. For example, you would install these services on firewalls such as pfSense: The dashboard of a pfSense Firewall.
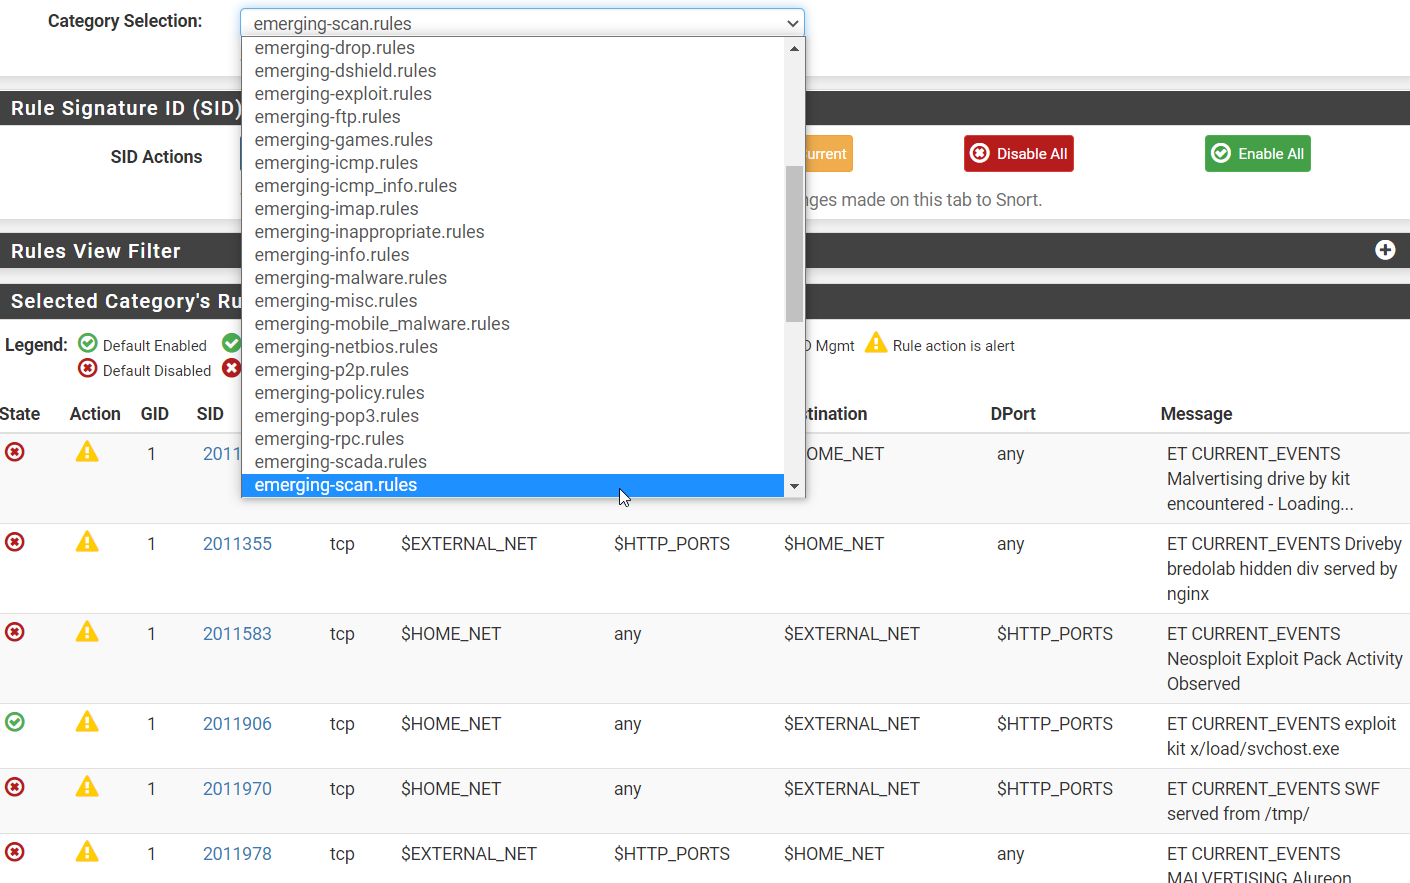
Rulesets such as the emerging threats for Snort and Suricata are capable of detecting and blocking a wide variety of potentially malicious traffic - including:
Malware traffic
Reverse shells
Metasploit payloads
Nmap scans
For example, detecting the Metasploit payload for CVE 2013-3205:

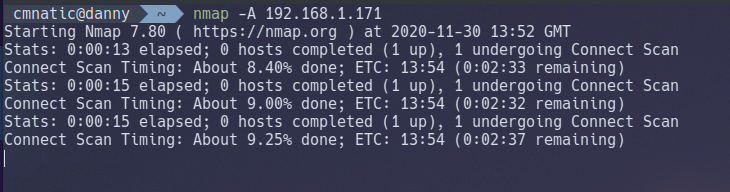
If properly configured, a majority of Nmap scans can be detected. This is especially true when using an aggressive timing template such as -T4 or -T5. Let's take a look at the following Nmap scan being detected: nmap -A 192.168.1.171
After returning to pfSense a few seconds later, we notice that alerts are being generated by Snort:
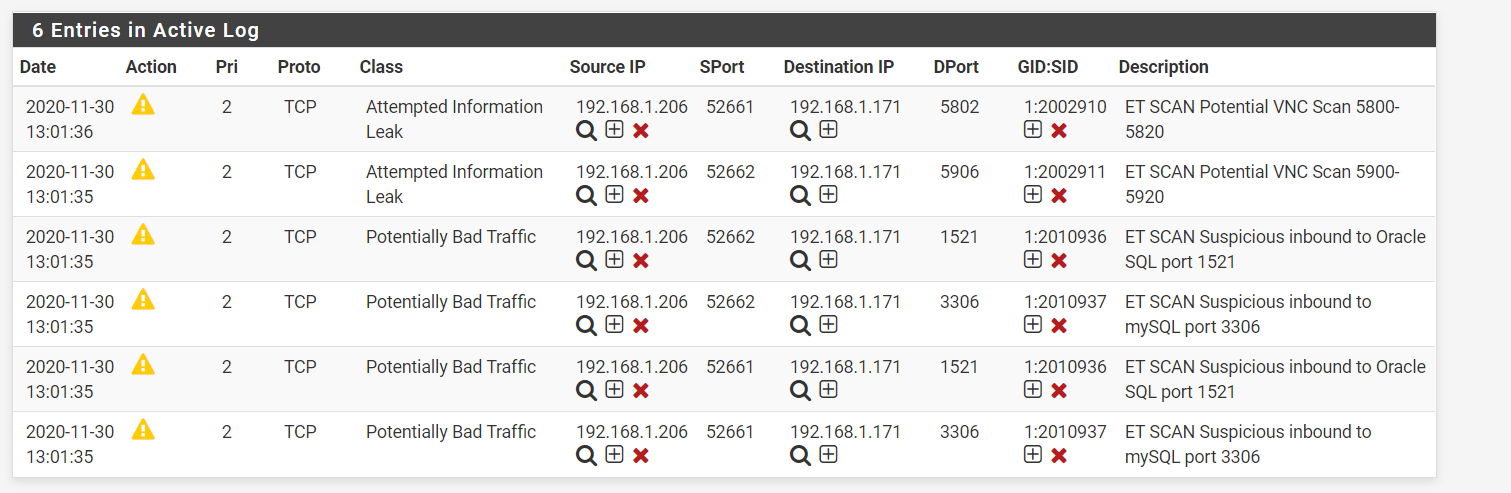
Even with a timing template of-T3, Snort is capable of detecting the port scan, where after 6 alerts (in this case) the attacker is then blocked by the firewall.


#1 When was Snort created?

1998
#2 Using Nmap on MACHINE_IP , what are the port numbers of the three services running? (Please provide your answer in ascending order/lowest -> highest, separated by a comma)

80,2222,3389
#3 Use Nmap to determine the name of the Linux distribution that is running, what is reported as the most likely distribution to be running?

ubuntu
#4 Use Nmap's Network Scripting Engine (NSE) to retrieve the "HTTP-TITLE" of the webserver. Based on the value returned, what do we think this website might be used for?

blog
Day 9 - [Networking] Anyone can be Santa!
What is FTP & Where is it Used?
The File Transfer Protocol (FTP) offers a no-thrills means of file sharing in comparison to alternative protocols available. Whilst this protocol is unencrypted, it can be accessed through a variety of means; from dedicated software like FileZilla, the command line, or web browsers, FTP Servers have been long used to share files between devices across the Internet due to its compatibility.
FTP uses two connections when transferring data, as illustrated below:

The standard for these two connections are the two ports:
Port 20 (Data)
Port 21 (Commands)
Commands involve actions such as listing or navigating directories, writing to files. Whereas, the data port is where actual data such as the downloading/uploading of files are transferred over.
Before any data can be shared, the client must log in to the FTP Server. This is to determine the commands that the client has the permission to execute, and the data that can be shared. Some websites use FTP to share files instead of the web server itself. Of course, this means that you'd have to share a username/password through some other way - that's not practical.
Enter FTP's "Anonymous" mode...This setting allows a default username to be used with any password by a client. This user is treated like any other user on the FTP server - including enforcing permissions and privileges to commands and data.
#1 Name the directory on the FTP server that has data accessible by the "anonymous" user

public
#2 What script gets executed within this directory?

backup.sh
#3 What movie did Santa have on his Christmas shopping list?

The Polar Express
#4 Re-upload this script to contain malicious data (just like we did in section 9.6. Output the contents of /root/flag.txt!


THM{even_you_can_be_santa}
Day 10 - [Networking] Don't be sElfish!
What is Samba & where is it Used?
Whilst we learnt about one of the most commonplace protocols that are used for file-sharing on Day 10, we'll be covering an alternative technology for file-sharing that is most used within organisation/company networks. Offering encryption as standard, this technology consists of two protocols:
SMB (Server Message Block) - Natively supported by Windows and not Linux
NFS (Network File System) - Natively supported by Linux and not Windows
Protocols such as SMB send "requests" and "responses" when communicating with each other, as illustrated below:

What makes Samba so popular and useful is that it removes the differences between these two protocols, meaning that the two operating systems can now share resources including files amongst each other. Simply, Samba connects to a "share" (think of this as a virtual folder) and is capable of day-to-day activities like deleting, moving or uploading files.
Samba is flexible in the sense it can be useful for both you and me or businesses with thousands of employees. For example, employees can access documents from a central computer rather than each employee storing their own copy. As previously mentioned, this technology is encrypted enabling sensitive data like username and passwords used in the authentication process (and the data itself) to be communicated between client/server securely.
#1 Using enum4linux, how many users are there on the Samba server (10.10.144.183)?


3
#2 Now how many "shares" are there on the Samba server?


4
#3 Use smbclient to try to login to the shares on the Samba server (10.10.144.183). What share doesn't require a password?

tbfc-santa
#4 Login to this share, what directory did ElfMcSkidy leave for Santa?


jingle-tunes
Day 11 - [Networking] The Rogue Gnome
What is Privilege Escalation?
On computing systems, there is a general rule of thumb that determines how someone interacts with a computer system and the resources within it. There are two primary levels of permissions that a person may have to a computer system:
User
Administrator
Generally speaking, only Administrators can modify system settings or change the permissions of other users resources like files and folders.
Privilege escalation is simply the process of increasing the current privileges we have to permissions above us
The directions of privilege escalation
Horizontal Privilege Escalation
A horizontal privilege escalation attack involves using the intended permissions of a user to abuse a vulnerability to access another user's resources who has similar permissions to you. For example, using an account with access to accounting documents to access a HR account to retrieve HR documents. As the difference in the permissions of both the Accounting and HR accounts is the data they can access, you aren't moving your privileges upwards.
Vertical Privilege Escalation
A bit more traditional, a vertical privilege escalation attack involves exploiting a vulnerability that allows you to perform actions like commands or accessing data acting as a higher privileged account such as an administrator.
#1 What type of privilege escalation involves using a user account to execute commands as an administrator?
Vertical
#2 What is the name of the file that contains a list of users who are a part of the sudo group?
sudoers
#3 What are the contents of the file located at /root/flag.txt?
Get the bash file this link https://raw.githubusercontent.com/rebootuser/LinEnum/master/LinEnum.sh
When you get LinEnum.sh file from the link. Then open an HTTP server and download the bash file to the victim server.


thm{2fb10afe933296592}
Day 12 - [Networking] Ready, set, elf.
Everything CGI (And no, not the movie kind...)
As you may have discovered throughout the "Web" portion of the event, webservers don't just display websites...They are capable of interacting with the operating system directly. The Common Gateway Interface or CGI for short is a standard means of communicating and processing data between a client such as a web browser to a web server.
Simply, this technology facilitates interaction with programmes such as Python script files, C++ and Java application, or system commands all within the browser - as if you were executing it on the command line.
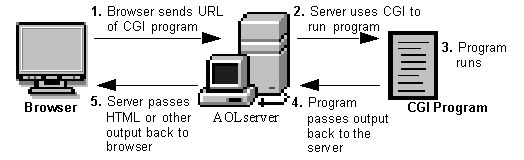
Despite their age, CGI scripts are still relied upon from devices such as embedded computers to IoT devices, Routers, and the likes, who can't run complex frameworks like PHP or Node.
The Nitty Gritty
Whilst CGI has the right intentions and use cases, this technology can quickly be abused by people like us! The commonplace for CGI scripts to be stored is within the /cgi-bin/ folder on a webserver. Take, for example, this systeminfo.sh file that displays the date, time and the user the webserver is running as:
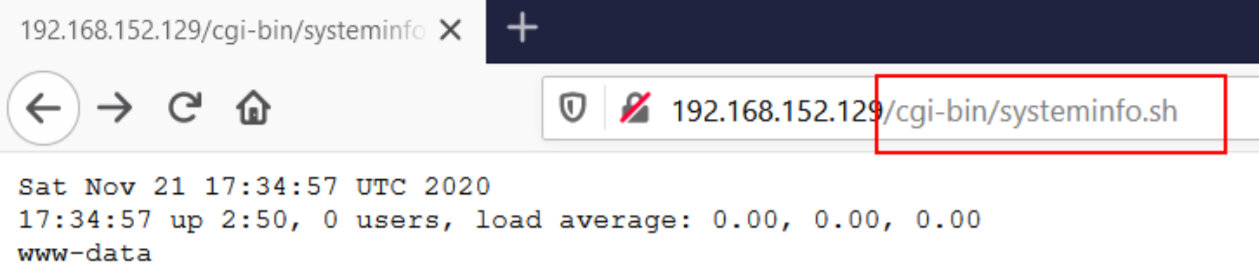
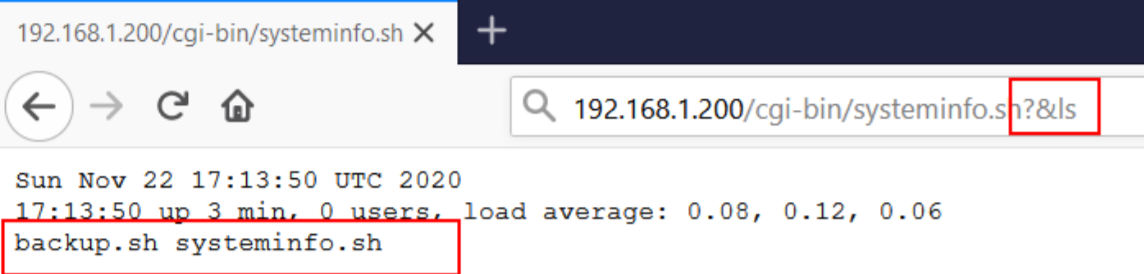
We could, perhaps, parse our own commands through to this script that will be executed. Because we know that this is a Ubuntu machine, we can try some Linux commands like ls to list the contents of the working directory:
Or on a Windows machine, the systeminfo command reveals some useful information:
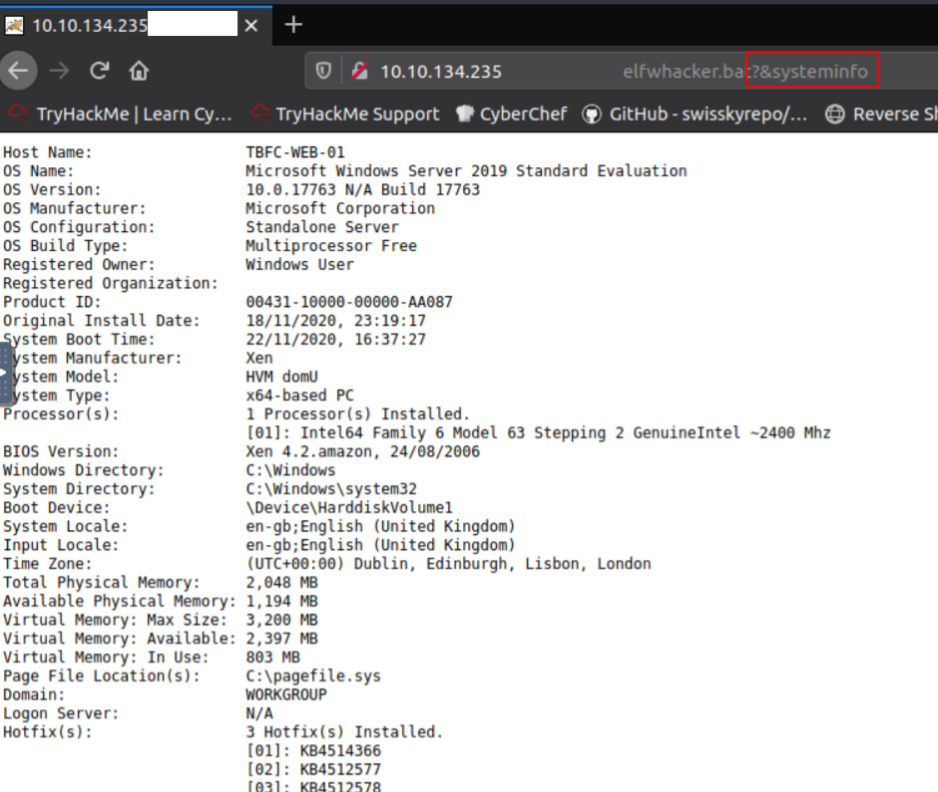
This is achieved by parsing the command as an argument with ?& i.e. ?&ls. As this is a web server, any spaces or special characters will need to be URL encoded.
#1 What is the version number of the web server?


9.0.17
#2 What CVE can be used to create a Meterpreter entry onto the machine? (Format: CVE-XXXX-XXXX)

CVE-2019-0232
#3 What are the contents of flag1.txt


thm{whacking_all_the_elves}
Day 13 - [Special by John Hammond] Coal for Christmas
Port Scanning
We will begin by scanning the machine. If you are working from the TryHackMe "Attackbox" or from a Kali Linux instance (or honestly, any Linux distribution where you have this installed), you can use nmap with syntax like so:
#1 What old, deprecated protocol and service is running?

telnet
Initial Access
Connect to this service to see if you can make use of it. You can connect to the service with the standard command-line client, named after the name of the service, or netcat with syntax like this:
#2 What credential was left for you?

clauschristmas
Enumeration
There is a great list of commands you can run for enumeration here: https://blog.g0tmi1k.com/2011/08/basic-linux-privilege-escalation/
#3 What distribution of Linux and version number is this server running?

ubuntu 12.04
#4 Who got here first?

grinch
#5 What is the verbatim syntax you can use to compile, taken from the real C source code comments?

gcc -pthread dirty.c -o dirty -lcrypt
Privilege Escalation
#6 What "new" username was created, with the default operations of the real C source code?
firefart
#7 What is the MD5 hash output?

8b16f00dd3b51efadb02c1df7f8427cc
Last updated